
services:
  docuseal:
    image: docuseal/docuseal:latest
    ports:
      - "3000:3000"
    volumes:
      - docuseal-data:/data
    environment:
      - SECRET_KEY_BASE=change-me-to-a-long-random-string
      - SMTP_ADDRESS=mailpit
      - SMTP_PORT=1025
      - SMTP_ENABLE_STARTTLS=false
      - SMTP_FROM=docuseal@example.com
    depends_on:
      - mailpit
    restart: unless-stopped

  mailpit:
    image: axllent/mailpit
    ports:
      - "8025:8025"   # web UI: read the emails DocuSeal sends
      - "1025:1025"   # SMTP
    restart: unless-stopped

volumes:
docuseal-data:This is the Build stage. It uses the Evidency sandbox. Read how it works first, and choose your setup if you have not yet chosen DocuSeal. Each step below is tagged with the recipe chain it implements: identity and consent, or integrity and date.
Step 5 has two branches. Which one you follow depends on your DocuSeal build, and one of them needs the timestamp proxy. The company root CA is optional. This setup is an evaluation: before real use, follow the evidence file checklist and running it for real.
1. Prerequisites
-
Docker Compose.
-
A timestamp provider for this tutorial’s integration: the Evidency TSA (RFC 3161). Its qualified timestamp service is documented at Evidency. You need your project’s timestamp URL and an API key.
2. Start the stack
This setup uses three services:
-
DocuSeal runs the signing workflow and generates its own root CA for the signing certificate. It stores data in SQLite.
-
Mailpit catches the invitation emails so you can read them without a mail relay.
-
Evidency TSA timestamps each seal through the RFC 3161 endpoint configured in step 5.
Create docker-compose.yml.:
| Setting | Why |
|---|---|
|
Signs sessions and encrypts the stored TSA header, so it must stay the same across restarts. |
|
Required once |
|
Mailpit’s SMTP listener has no STARTTLS and DocuSeal defaults it to |
The docuseal-data volume keeps the SQLite database and the stored PDFs outside the container. Without it, a container rebuild deletes everything, including the generated signing certificate.
Run this in the folder that contains docker-compose.yml:
docker compose up -dOpen http://localhost:3000 for DocuSeal and http://localhost:8025 for the Mailpit inbox.
3. Create the account
The first visit redirects to /setup. Fill in your name, email, company name and a strong password, then submit. This account is the administrator.
4. Signing certificate: keep DocuSeal’s own root CA
Chain 2: integrity and date. See the recipe.
Nothing to configure. On first start DocuSeal generates a private PKI (root CA, sub-CA, signing certificate) and uses it for every PDF it seals. Open Settings → E-Signature and check the Signing Certificates table: DocuSeal Self-Host Autogenerated is marked Default.
Setting up your own company root CA is not required to follow this tutorial, but it is recommended: a certificate issued by your own organisation makes the seal immediately recognisable as yours, instead of DocuSeal’s. See How to generate a root CA for the OpenSSL commands and the upload steps.
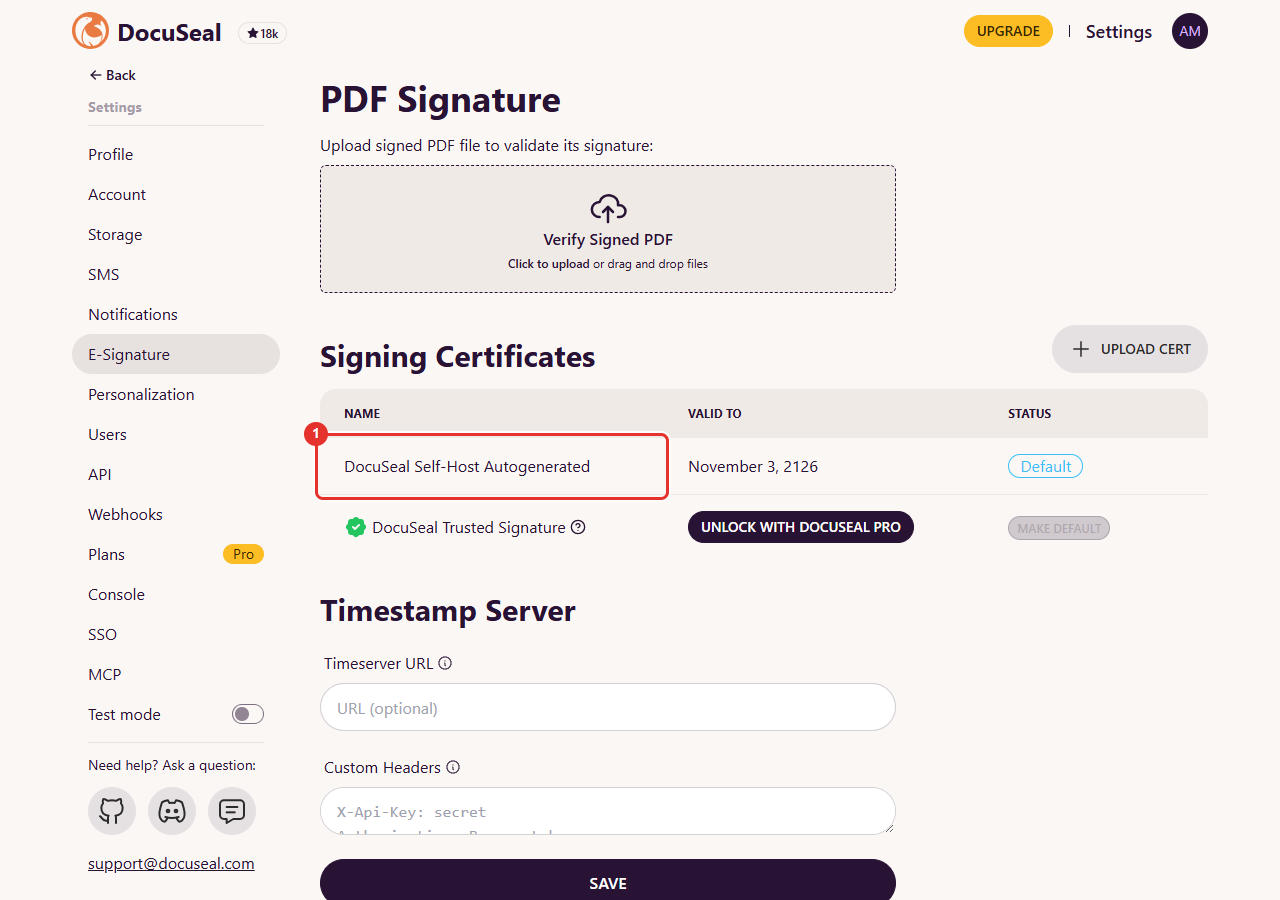
The autogenerated certificate is already the default. It is valid for 100 years.
What this means for trust. The root CA is private to your deployment, so other readers show an unknown signer until they trust it. See step 9.
5. Connect the Evidency timestamp server
Chain 2: integrity and date. See the recipe.
Have your sandbox project ID and API key ready. DocuSeal must send the key in an X-API-KEY header on every timestamp request. Open Settings → E-Signature and look at the Timestamp Server section, then follow the branch that matches what you see.
| What you see | Branch |
|---|---|
A Timeserver URL field and a Custom Headers field |
|
Only a Timeserver URL field |
Branch B: add the timestamp proxy. This is required, not optional. |
The Custom Headers field depends on pull request docusealco/docuseal#741, a draft at the time of writing, so many builds show only the URL. You can follow docusealco/docuseal#739.
Branch A: Custom Headers field
Fill in:
-
Timeserver URL:
https://api-sandbox.evidency.io/v3/projects/<PROJECT_ID>/timestamp, with your own sandbox project ID. -
Custom Headers:
X-API-KEY: <YOUR_EVIDENCY_API_KEY>, one header per line.
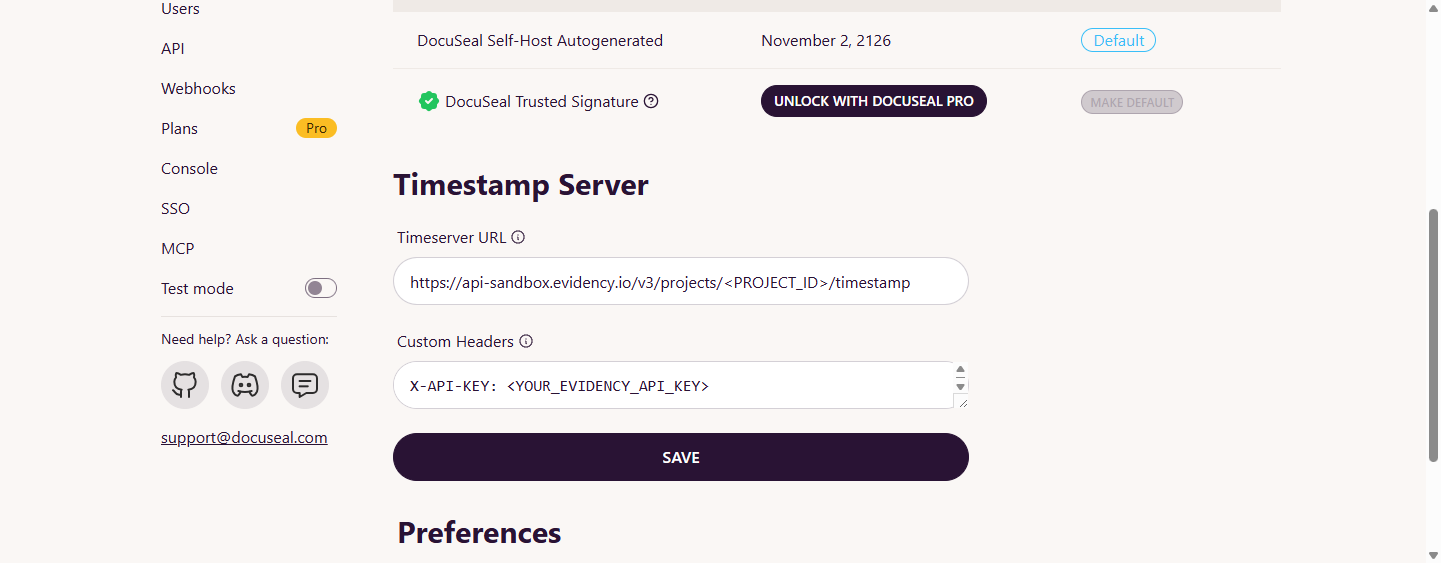
Placeholders shown here. Use your own project ID and key.
Branch B: no Custom Headers field
Put a small nginx proxy between DocuSeal and the Evidency TSA. The proxy adds the X-API-KEY header, so DocuSeal never holds the key.
-
Add the proxy service from the timestamp proxy tutorial to the
docker-compose.ymlfrom step 2, so both run on the same Compose network. Put the project ID and API key in its.env. -
In DocuSeal, set Timeserver URL to
http://tsa-proxy:8089/. Leave Custom Headers empty, or absent.
Both branches
Click Save. DocuSeal sends a test request to the timestamp server on save, so an error in the URL, the key or the proxy shows up at this point.
The API key is a secret. Do not commit it, paste it in tickets, or screenshot it. Anyone with it can request timestamps against your quota.
From now on DocuSeal makes one timestamp request per signed document and one for the audit log: N + 1 for N signers.
6. User consent before signing
Chain 1: identity and consent. See the recipe.
The regulation requires that each party gives informed consent before they proceed to the signature. Do not rely on the signing button alone. Configure consent before you configure email identification and before you build the template.
-
Add a required Checkbox field as the first field of each party in the template, labelled with the consent text (for example: “I consent to sign this document electronically and to the processing of my email address and signing data as described in the privacy notice”). The party cannot reach the signature field without ticking it.
-
Link the privacy notice and the terms of use in the invitation email text (Settings → Email) so the information is available before the signer opens the document.
-
Keep evidence: the checkbox value is part of the submission and appears in the audit log, which is itself sealed and timestamped.
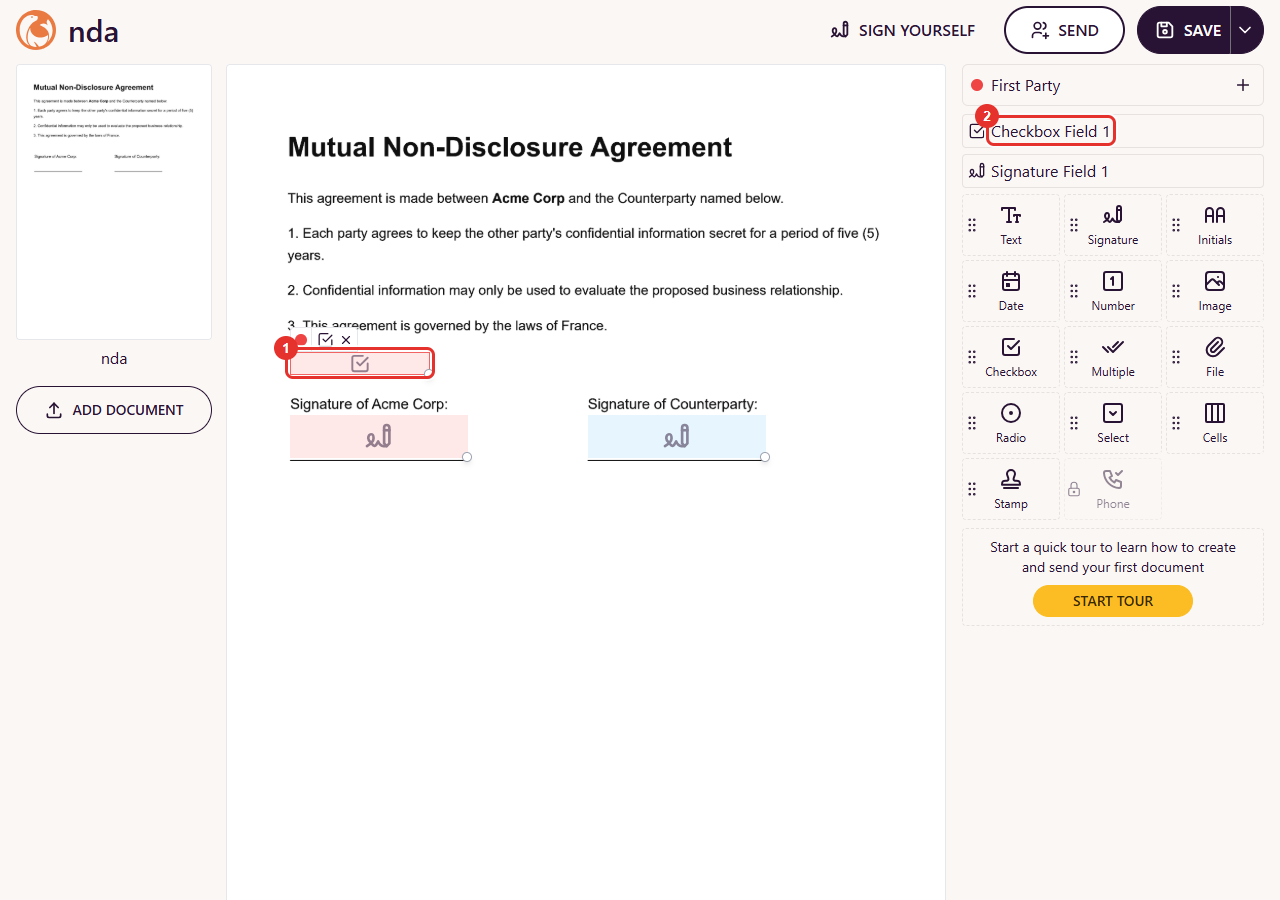
The consent checkbox sits above the signature and is first in the First Party list.
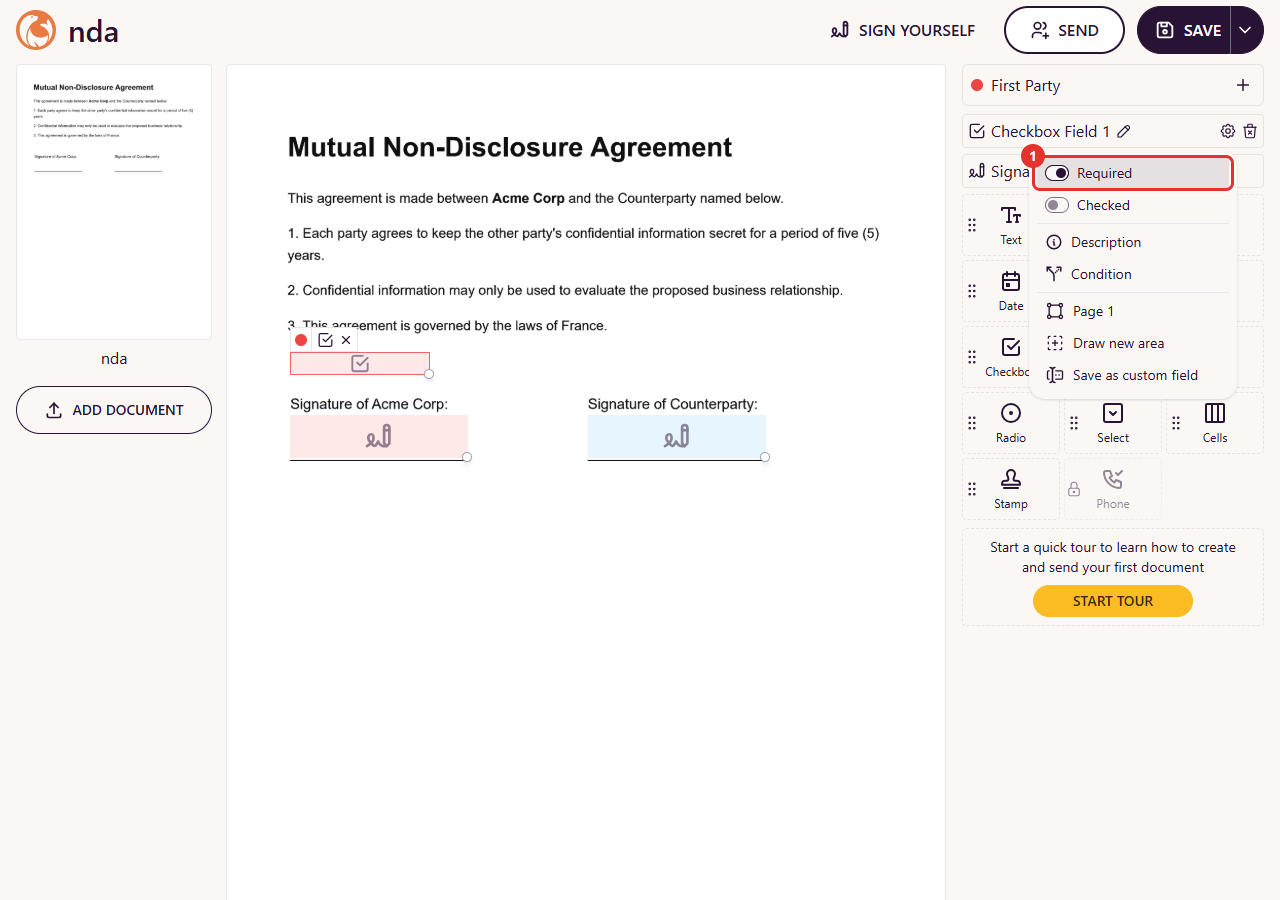
Switch on Required in the field’s settings (gear icon).
Have your legal counsel validate the wording of the consent and the information given to signers for your jurisdiction. The consent step comes before the email step because the template design drives what the signer sees in the invitation.
7. Email identification of the parties
Chain 1: identity and consent. See the recipe.
On this path a party is identified by control of an email address: DocuSeal sends each signer a unique link and records the address, IP, user agent and times in the audit log. There is no passcode or ID check. That is the minimum viable SES attribution and is weak if a mailbox is shared or compromised. For internal use, the corporate mailbox is provisioned and controlled by the organization, so email control is a strong attribution.
-
Local evaluation: the Mailpit variables from step 2 are enough. Every email lands in the Mailpit inbox.
-
Real relay: remove the
SMTP_*variables and enter host, port, credentials, security mode and Send from under Settings → Email, or setSMTP_USERNAME,SMTP_PASSWORDandSMTP_AUTHENTICATIONnext to the others. Use a sender on a domain you control, with SPF and DKIM, or invitations will go to spam.
8. Smoke test: one document, two parties
This is the shortest run that exercises the email, seal and timestamp settings. Upload any one-page PDF on the dashboard. DocuSeal opens the template editor. Add a Signature field for the first party, use the + button to add a Second Party, place its Signature field, then Save.
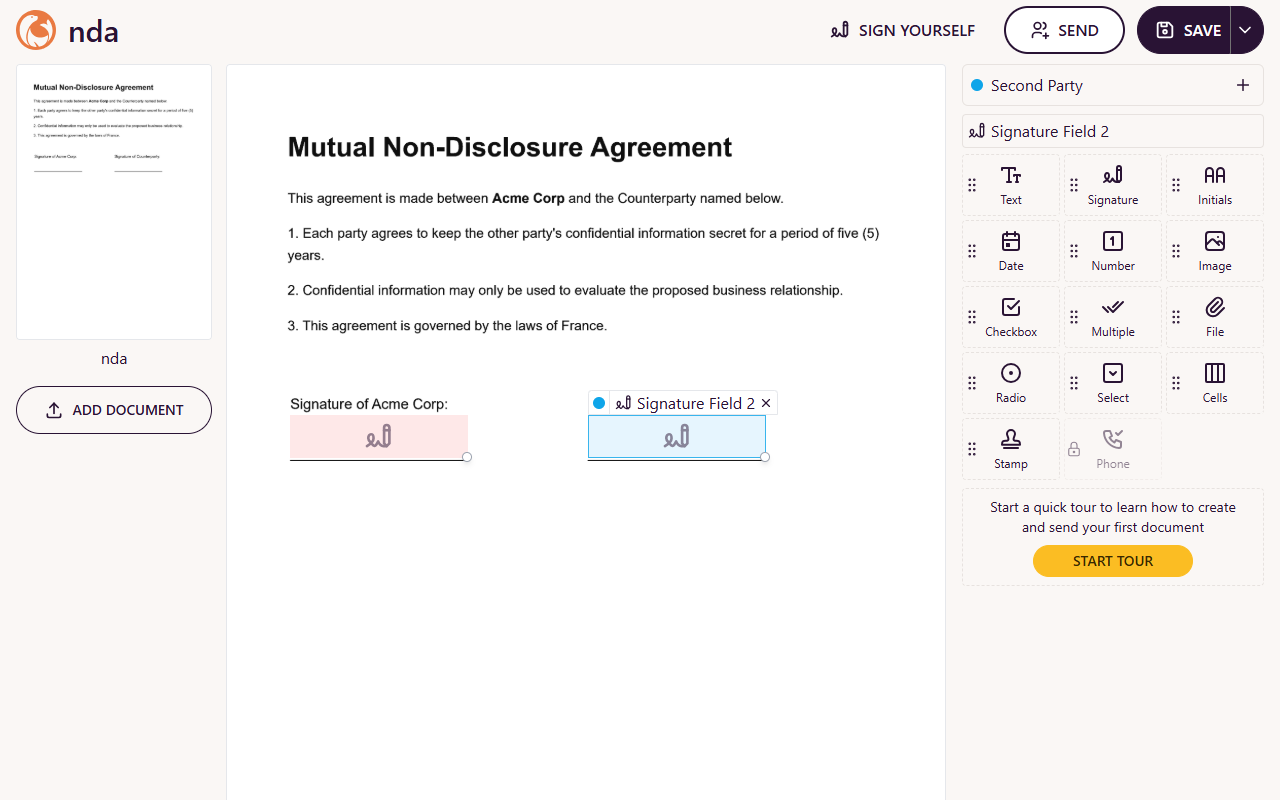
Two parties, one signature field each.
Open the template, click Send to recipients, enter one email per party and leave Preserve order on, so the second invitation only goes out once the first party has signed.
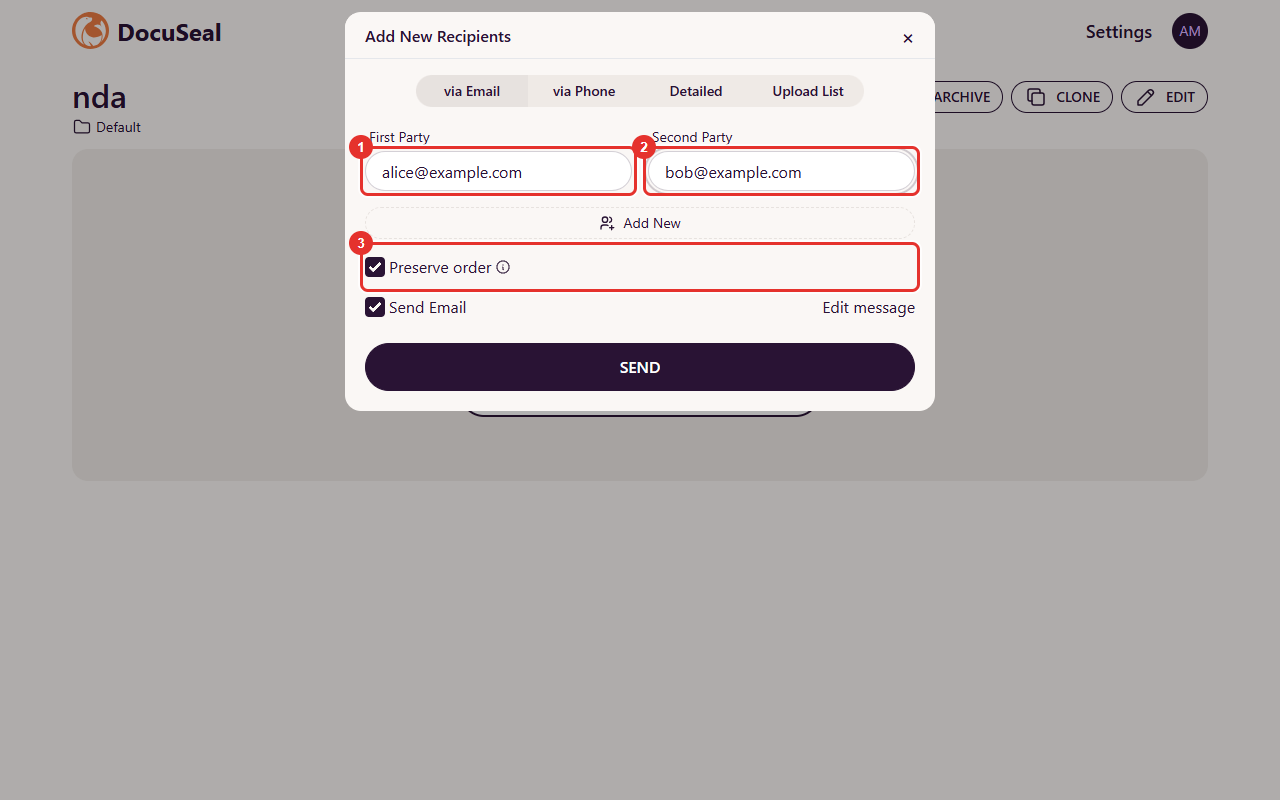
Two email addresses: the parties' identities on this path.
The first party receives the invitation in Mailpit.
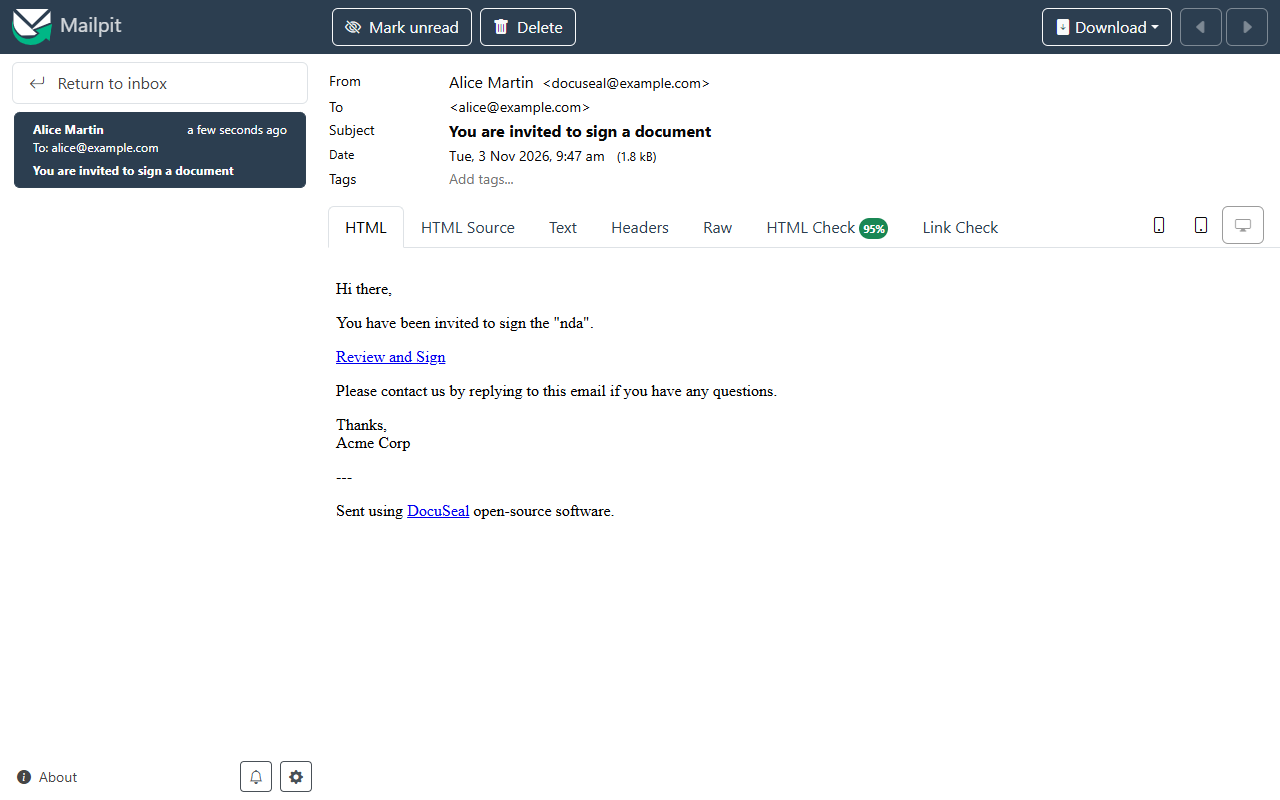
Click Review and Sign in the email.
Click Sign now, type the name and choose Sign and complete. Repeat with the second invitation, which arrives after the first signature.
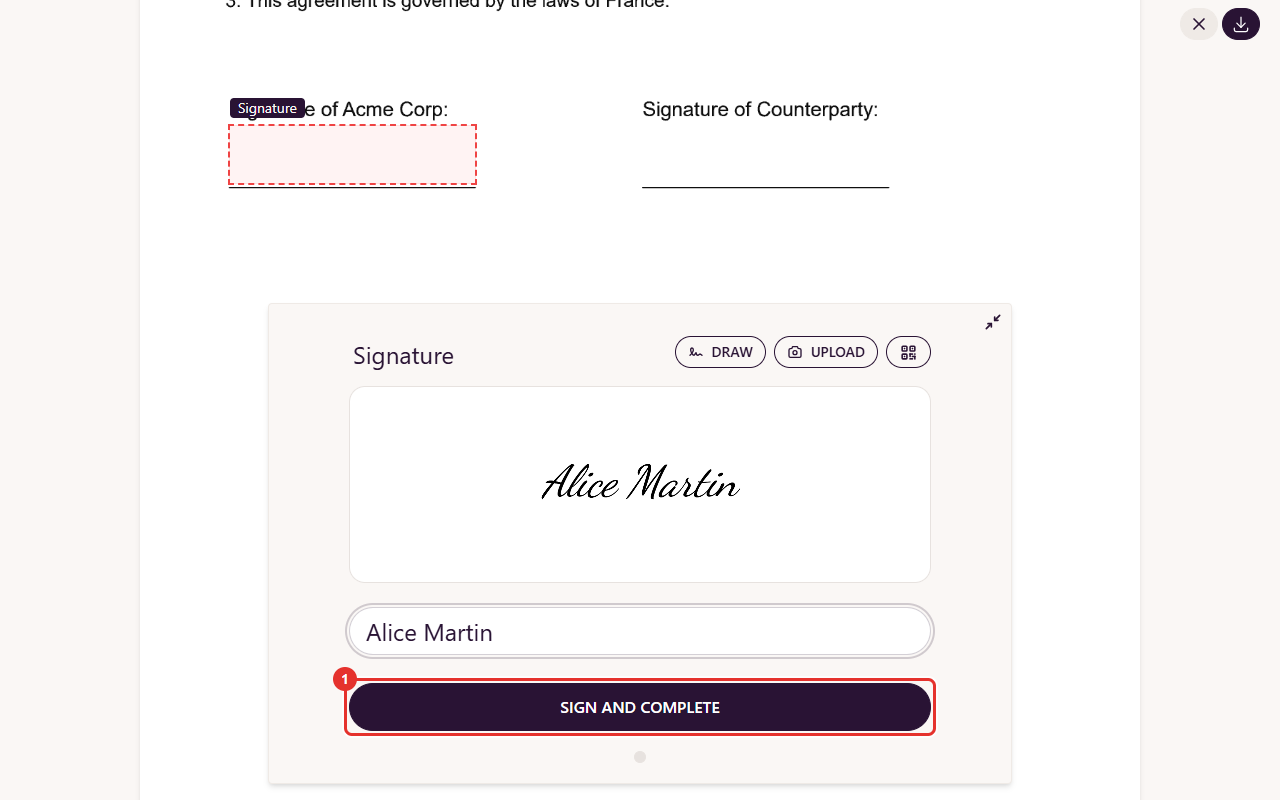
Signing as the first party.
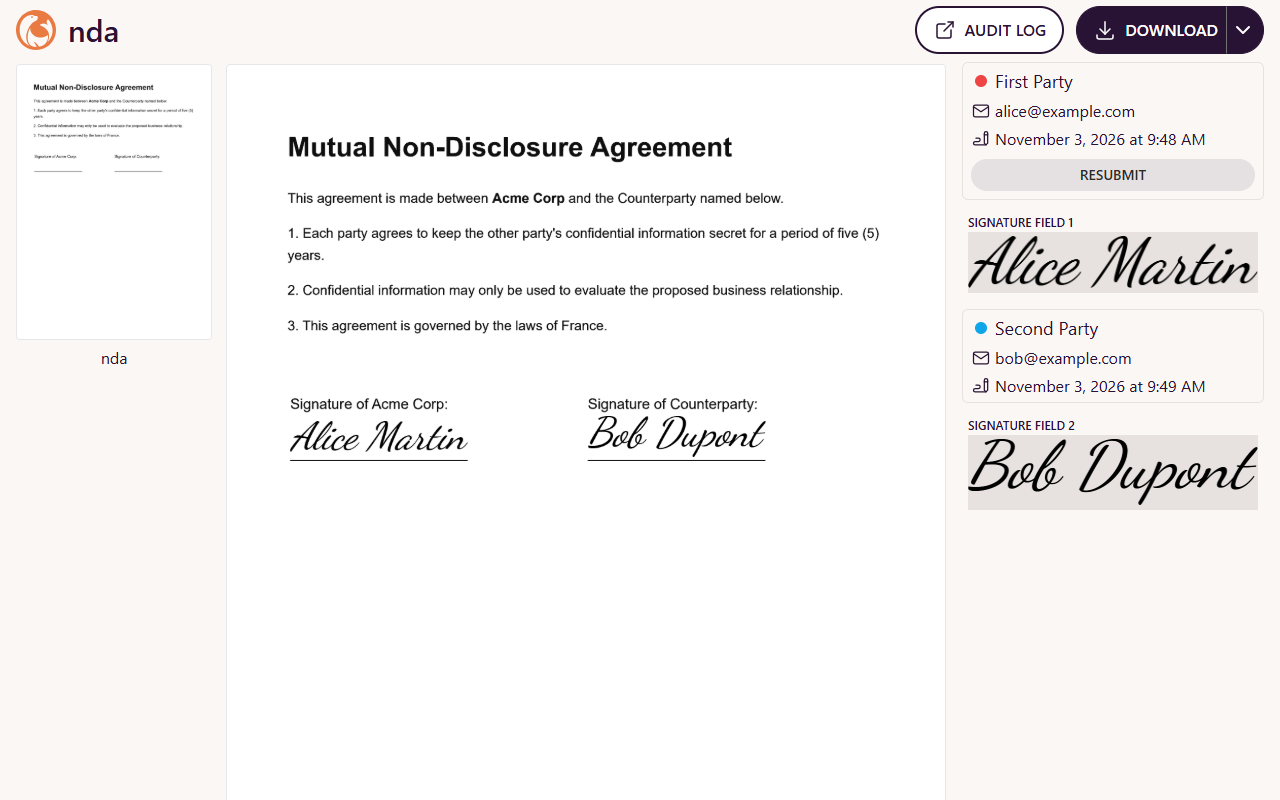
The completed submission. Use Audit log to open the sealed audit PDF.
9. Verify the seal and the timestamp
Chain 2: integrity and date. See the recipe.
Open Audit log on the submission and download the PDF. It is signed and timestamped the same way as the signer documents. Verify it in DocuSeal. This tutorial does not set up a hash chain across audit entries: the evidence you check is the PDF seal and its timestamp, not a chain of entry hashes.
In DocuSeal
On Settings → E-Signature, drop the PDF on Verify Signed PDF.
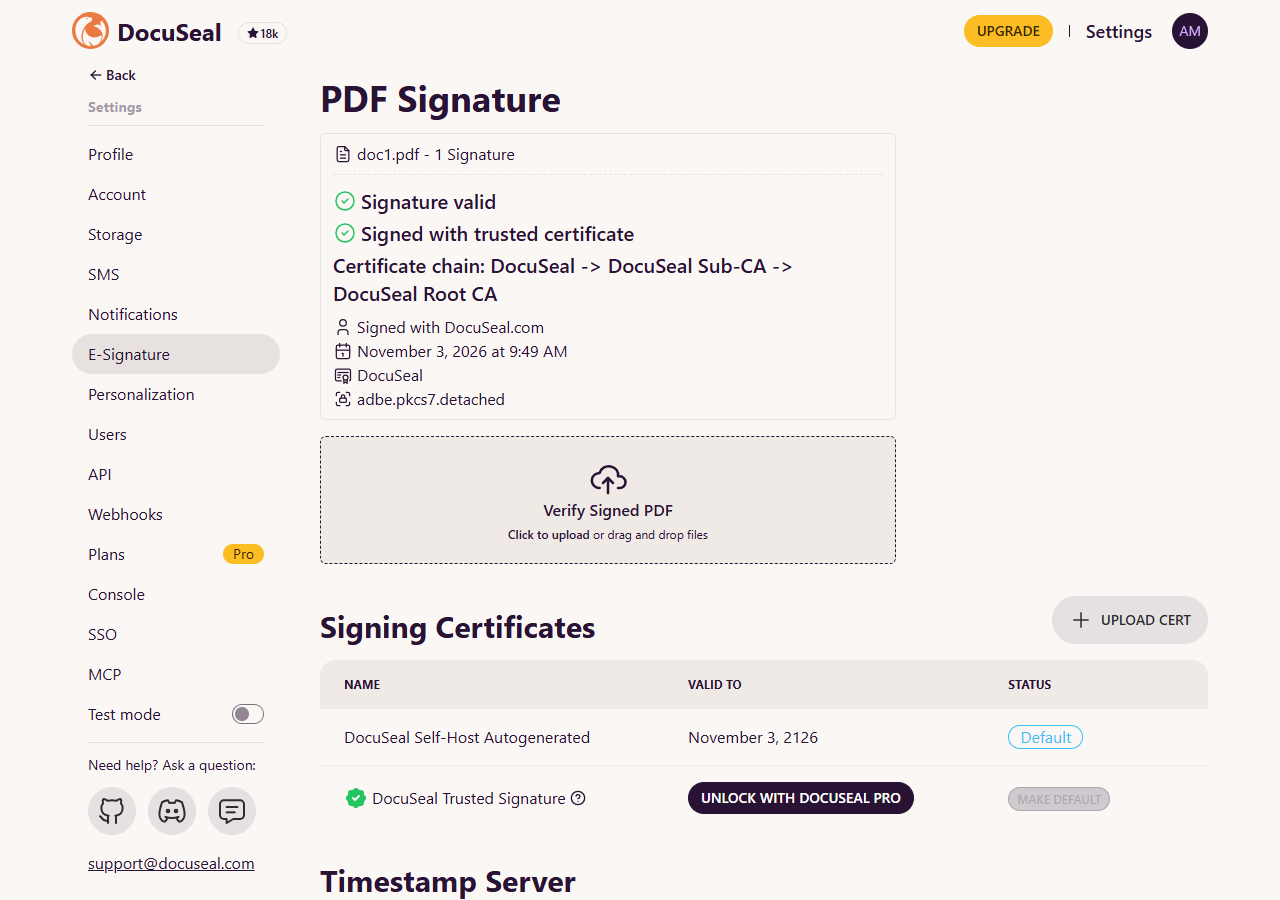
Expected chain: DocuSeal → DocuSeal Sub-CA → DocuSeal Root CA.
“Signed with trusted certificate” here only says DocuSeal recognises its own configured chain. It is not what a third party’s reader will conclude. See Make the seal trusted for other validators below.
For full validation use openssl ts -verify with the Evidency TSA certificates, or a PDF validator.
In Adobe Acrobat
Acrobat can also verify the seal. By default it shows the signature as unknown, because the DocuSeal root CA is not in its trusted certificates. Add the root CA as trusted once on the verifying machine:
-
Open the downloaded PDF in Acrobat and open the signature panel. Select the DocuSeal signature, then select Show Signature Properties and then Show Certificate.
-
In the certificate viewer, select the Trust tab, then select Show all certification paths and select DocuSeal Root CA at the top of the chain. Select Export and save it as a
.cerfile. -
Press Ctrl+K to open Preferences. Select Signatures. Under Identities & Trusted Certificates, select More. Select Trusted Certificates, then select Import, and choose the
.cerfile. -
In the import dialog, tick Use this certificate as a trusted root, then select OK.
-
Close the dialog and reopen the PDF, or select Validate All Signatures in the signature panel.
The signature panel now shows the signature as valid. The certificate chain (DocuSeal → DocuSeal Sub-CA → DocuSeal Root CA) appears green, and the document is reported as unchanged since signing.
The same process applies if you use your own company root CA instead of DocuSeal’s. Export your company root certificate, import it as a trusted root, and the chain appears green in the same way.
Make the seal trusted for other validators
CN=DocuSeal is issued by CN=DocuSeal Sub-CA, which chains to DocuSeal Root CA. Only your instance vouches for that chain, so each validator must trust it once, as above. To avoid repeating the export on every machine, publish the root certificate and its SHA-256 fingerprint to your internal PKI trust store or documentation portal. Do not publish it on a public website.
10. Troubleshooting and next steps
| Symptom | Likely cause |
|---|---|
No invitation in Mailpit |
Missing |
Second party gets no email |
Expected until the first party has signed, because Preserve order is on. |
Saving the timestamp settings fails |
Wrong project ID or API key, or the host cannot reach the TSA. Test the URL from inside the container. |
No timestamp in the PDF |
Timestamp URL empty, or the signature job failed. A failed TSA call fails the signing job, so look in the logs. |
Settings unreadable after rebuild |
|
Internal validator sees "unknown signer" |
The DocuSeal root CA is not in the validator’s trust store. See step 9. |
Your DocuSeal has no Custom Headers field |
Use branch B in step 5. |
Next, before you use this for real documents:
-
Evidence file checklist: what a contested signature needs, and what the setup gives you.
-
Running it for real: HTTPS, PostgreSQL, real IP, backups, updates and retention.